Tutorial:
Glider (a movement exercise).
1 What
kind of program is Cult3D?
Cult3D is the new multi-platform 3D object-rendering engine. It is a 100%
software product. No additional hardware-such as 3D accelerator cards-is required.
As a desktop or notebook user, you can now view 3D objects in real time, a capability formerly found only on high-end workstations. Cult3D gives internet users the opportunity to view high-quality 3D objects online on most platforms.
All actions and interactions in the model are defined by events. An event can be a pressed key, timer expiring, mouse button clicked, etc. Events are generated by such actions as play sound, play animation, go to URL, etc. You can also add Java code to manage more complex sequences of actions.
The Cult3D Designer can edit and extend the objects and animations exported by the Cult3D Exporter in the *.c3d file, in order to define and add more complex sub-animations (such as interpolation-morphing-between two different frames in the animation.)
2 How
does Cult 3D work?
The Cult3D Designer is an application for adding the interactivity to your
already modelled 3D object.
You can add animations, sounds, links, Java code, clickable areas, and movement patterns to the object. If you use a Cult3D Exporter plugin for you favourite 3D modelling/animation software, you can export the data as a Cult3D Designer file [*.c3d] and load it in Cult3D Designer.
After editing the object, Cult3D Designer saves the presentation as a Cult3D Designer file [*.c3d] (for the object data) and a Cult3D Project file [*.c3p] (for project information and references to external resources such as sound and Java code).
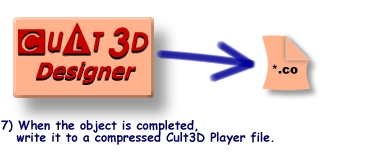
Once you are satisfied that the presentation is complete, you save it as a Cult3D Player file [*.co] for the Cult3D Player plugin to play.
Cult3D Designer
creates a compressed binary file with the extension *.co that can be published
locally or on the net.
Here is an example of a typical project made into a 3D presentation using Cult3D Designer.
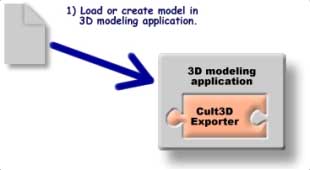
Use your
3D-modelling package and take either an existing model or create a new from
scratch. The result is going to be much better with a model that is well-balanced
between enough detail to show what is going on, and being small enough to
load and render fast.
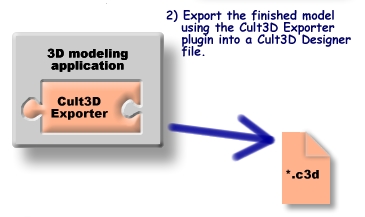
Once you are satisfied with the way the model looks in your 3D modelling application,
you can export it to a Cult3D Designer file [*.c3d]. This is the file format
used to maintain a Cult3D object by Cult3D Designer.
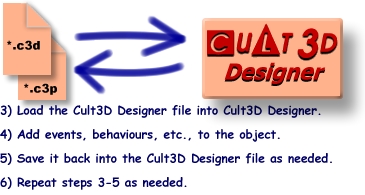
You can now edit the object in the Cult3D Designer by adding events, actions, sounds, etc. You can preview the end-user's view of the object inside Cult3D Designer. Then save the object back into a Cult3D Designer file [*.c3d] in order to make changes possible in the future.
Now you may create the file that the end-user will actually view. This Cult3D Player file [*.co] is compressed and heavily optimised to reduce file size. It also allows the Cult3D Player to start displaying the contents.
Important
![]()
-
Make sure that you have
saved your object as a Cult3D Designer file [*.c3d]. Once you have created
a Cult3D Player file [*.co] you can not convert it back into editable data
or even open it in Cult3D Designer. This allows Cult3D to truly optimise the
file for viewing and throw away all the editing information. It also protects
your model from modifications by others.
- Only persons in possession of the Cult3D Designer file [*.c3d] can modify the object and create a fresh Cult3D Player file [*.co].
- It is very important to keep the original file name of the designer file after you have created a project file. If you change the name of the designer file after you have created a project then the project file can't be executed.
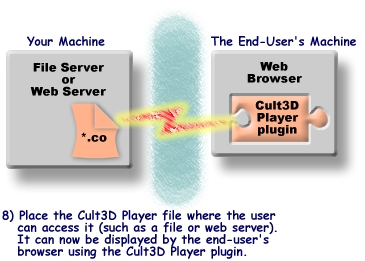
Now you may place the Cult3D Player file [*.co] where the user can access it, (a web server, a file server or the user's local disk) and then make a link to it.
Example: You have a Cult3D Player file [*.co] named plan-40.co. The snippet to access it might look like below.
|
<object <param <embed |
3 How do I start working with the tutorial file?
Task 1: Start Cult 3D and open the file Minidisc.c3d
- Click the start button.
- Choose Program and Cult 3D Designer to start.
- Choose Open in the File menu.
- Select the file Minidisc.c3d and click Open
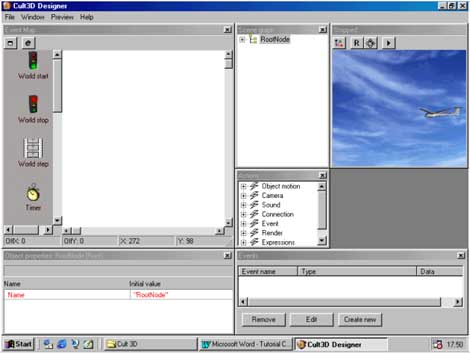
3.1 What do I see on the screen?
The Cult3D Designer main work area consists of six different subwindows: Event Map, Object Properties, Actions, Events, Scene Graph and Preview.
Event Map-window
An event is used to trigger an action. An event can be a left mouse click,
a right mouse click or a middle mouse click. It can also be a pressed or released
key on the keyboard.
Events specify the input that triggers or drives the actions in the scene. The list below shows the different types of events that can be used in the Event map window.
| World
Start This event is triggered when the scene loads. |
|
| World
Stop Occurs when you quit the scene, i.e., load another scene. |
|
| World
Step Gets triggered every time that the scene gets rendered, which normally happens about 30 or 15 times per second. All this depends on the users computer and the scene/object running. If for instance the object is small and uses very few polygons, then this event can get triggered up to 200 times per second. This event is useful to call Java actions which have real time constraints or things that should continuously happen. |
|
| Timer
The event is triggered after an author definable duration. By double-clicking the timer icon you can change the delay. The delay time is dependent on the speed of the processor. |
|
|
[Left, Middle,
Right] Mouse Button Pressed Normally, Windows users have a two-button mouse (left and right), while Macintosh users use a one-button mouse (left). Macintosh users can use the control key to simulate the right mouse button. |
|
|
Keyboard Button
Pressed |
|
| Keyboard
Button Released Works like the Keyboard Button Pressed event, but activates only when the end-user has released the key specified. By double-clicking the Keyboard Button Released event, you can define which keys or sequences of keys that should trigger the event. |
|
| Object
Motion Completion An object motion action has been completed. |
|
| Sound
Completion A sound action has been completed. |
|
| Manual
This event is what one would call a "dummy" event. The only time it gets triggered is if another event triggers it. |
|
For every event there is an options menu that can be popped up with a right-click on the respective event. All new events that are added to the Event Map window are initially set to Initial Activation and Automatic Reset. The options menu lists the settings for the event:
|
 |
|
| Initial Activation | An
event can only be triggered "by it self" if Initial Activation in the
option menu is selected. If you unselect Initial Activation then you have
to attach another event that triggers the original event. This is done
by connecting the action Activate Event to both events. |
|
| Automatic Reset |
Events can only be triggered when they are in the reset state. All events start out reset, but once triggered they must be reset before they can be triggered again. You can either do an explicit reset with a Reset Event action, or you can set it to automatically reset after it has been triggered by checking the Automatic Reset option in this menu. Example 1: Attach a Left Mouse Button event to an object. Unless Automatic Reset is activated (or the event is explicitly reset with a Reset Event action) the end-user will only be able to trigger it once by clicking. Example 2:
If you set a Timer event to trigger a System Beep action after 2000ms,
and enable Automatic Reset, then the beep will sound every 2 seconds. |
|
| Change Name | Changes
the name of the event. |
|
| Collapse Inputs | Collapses
the tree of objects and actions to one icon. |
|
| Delete | Deletes the event. | |
| Scene
Graph-window The Scene Graph window shows a hierarchical view of the data associated with objects and cameras. You can use the Scene Graph to drag object icons to the Event Map in order to define new interactions. |
 |
|
Preview-window
The toolbar in the Preview window has four different buttons. Show Pivot
Reset Translation
and Rotation Toggle Select
vs. Rotate-Zoom-Translate
|
|
| Mouse Button | Resulting Effect |
| Left | Zoom |
| Left & Right | Translate (move) |
| Preview
Run/Stop Press this button when you want to start the preview session. Press again when you want to stop the session. |
|
Actions-window With Cult3D Designer, you get some pre-made actions. With these you can control your scene and object to your desire. You connect an action to an event, and then connect the selected data (i.e. object, sound, etc.) to the action you want the data to perform. |
 |
|
By opening the Object Properties window and selecting an object, you can view the list of properties currently bound to the object. The window shows three columns, one each for name, initial value, and data type.
If you want to change an event type, you can easily do it here, instead of removing the old event with all it's connections, and then create the new one and connect the old connections to the new one.
|
|
3.2 Start working with the file Glider.c3d
|
The scene graph includes all the scene data included in the Cult3D Designer file [*.c3d], such as cameras and object information. If the objects are placed in a hierarchy, the hierarchy is shown in the scene graph. An example of a Glider Player object, shown in the Preview window [figure 1] right below, has a scene graph, as shown in [figure 2] left below. |
|
 |
 |
We will now define the scene. |
|
| When the specific sub-object is shown in the Event Map, drag that object onto a created event. In the Event Map a connection is shown by a drawn line between the object and the event connected to it. | |
 The
completed Glider player object as well as all the files used in this
tutorial are available in the à\Objects\ directory located in the Cult3D
Designer folder.
The
completed Glider player object as well as all the files used in this
tutorial are available in the à\Objects\ directory located in the Cult3D
Designer folder. | 1
Grab and drop the event World start to the event map. 2 Grab the sub-object Glider from the scene Graph window and drop it on the event map. 3 Go to Actions window and drag the action Bind Arcball to Event_1. You will find this action under the category Object motion. 4 Drag and drop the object Glider to the action Bind Arcball. |
 |
|
|
 |
|
|
 |
You can now test the Glider by pressing the Preview Run/Stop button in the preview window and pressing the "1" key. The Glider will stop when you release the key. |
|
|
12 Double click on the Event_3 icon. Select 1 from the translation action detail list and click add. 13 Grab the action Stop Translation and drop it on Event_3. 14 Drag the object Glider to the action Stop Translation. This will stop the animation when you release the "1" key. We will also need a key to reset the Glider. 15 Grab the event Key-Press-Release and drop it in the Event Map Window. 16 Double click on the Event_4 icon. Select 2 from the translation action detail list and click add. 17 Grab the action Reset and drag it to Event_4. 18 Drag the object Glider to the action Reset. 19 Run the animation. Try setting different values for the action Translation. |
|
|
The final design may look something like the figure below.
|
|